When it comes to submitting documents to court, there have always been specific requirements and standards that must be adhered to.
Now that eFiling is becoming the preferred way to submit filings in many counties—and will eventually become the only way to file in most—there’s a host of new details for paralegals and other legal support professionals to learn and apply in order to produce a court-friendly PDF.
One of these important details comes at the end when it’s important to “flatten” all fillable PDF forms so that the information you’ve added is retained and is visible to the court clerks.
Using and changing interactive forms
Forms that can be filled out and edited digitally—also called fillable, dynamic, or interactive forms—are the best way to ensure accuracy and the easiest way to input information. Once you’ve completed the form, it’s not enough to save the document as a PDF; you must take it one step further and flatten the document, removing all interactive materials so that viewers can only see the final answers.
Why should you flatten your PDF documents? There are a few reasons that this step is not only required but also just a good practice in general.
Flattening forms:
- Keeps form values permanent. If you send out an interactive PDF, every carefully filled out field remains up for revision—either accidentally or deliberately. Make sure that only your version of the form is visible.
- Removes values on drop down lists. While a fillable form will show fields for possible edits, a flattened document will show only the final text, not the presence of other options nor even that there were ever other options.
- Simplifies the PDF. An interactive form makes for a larger file, which may mean it is impossible to upload for eFiling. Flattening it reduces the file size, making it faster to render and easier to view.
Flattening a form is not the same as “locking” it, which restricts access to editing, printing, and copying the document. Courts will not accept files that are locked, as they will then have limited ability to work with them, so make sure that your files follow all formatting rules.
Convert a fillable form: step-by-step
First, make sure that all the information in your form is correct and that it is complete. For additional assistance, check out our quick guide on how to make any form fillable.
Adobe Acrobat is one of the most widely used PDF editing tools, and the one favored by many courts. There are also other PDF software programs that might be a better fit for your law firm, many of which have the same essential features and should work for your purposes.
Note that you’ll need to professional, paid-for, version of Acrobat. The free Acrobat Reader cannot convert a fillable form, or perform similar functions.
Step 1: Open the document in Acrobat
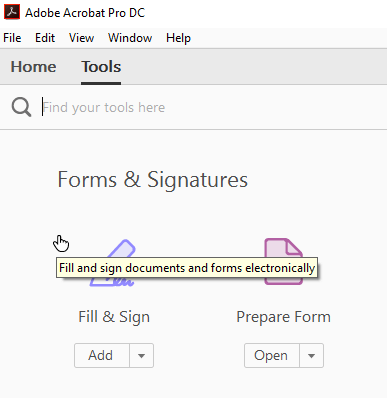
In Adobe Acrobat, choose the Fill & Sign or Prepare Form tool and select a file to upload. Fill in all necessary information.
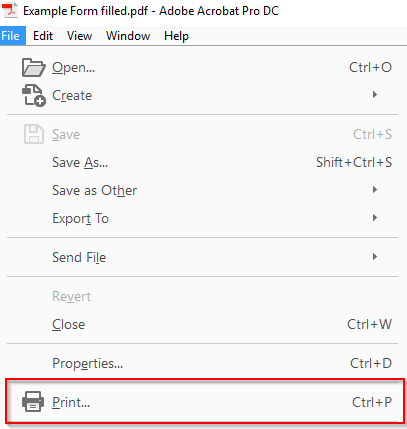
Step 2: Select File > Print
Once you have completed the form, you’re ready to flatten it. Go to the print settings by selecting File > Print.
Step 3: Select the PDF printer
On the pull-down menu of printer options, choose Adobe PDF. This feature would have been installed automatically at the same time as Adobe Acrobat itself. If it’s not visible or you’re using another PDF editor, you can download many other PDF printer drivers from the internet.

Step 4: Save to specified location
After you click OK, a pop-up will ask how you would like to save the PDF. Be sure to select a particular location and a unique file name that will place your document in a place where you can easily find it. Don’t get it mixed up with the fillable form!
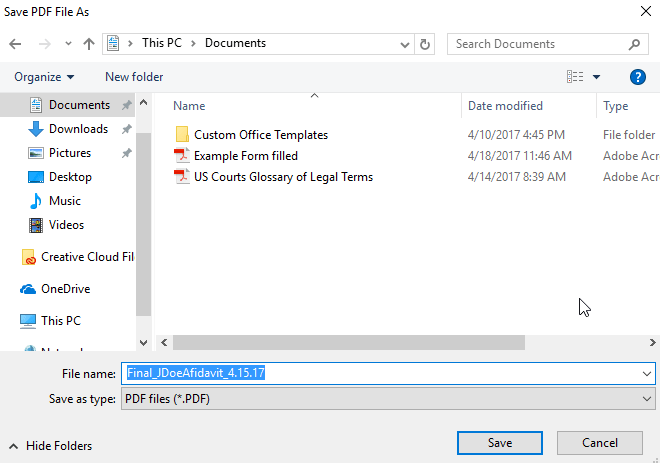
The flattened form should be ready and waiting in that new location with that new name. Open it up to check once more for any changes and to confirm that the conversion worked.
And you’re ready to upload a flattened, optimized, secure PDF to your eFiling platform!
***
Have more questions about formatting documents so that courts will accept them? Contact us for more information or explore our step-by-steps guides and training webinars on our support pages.


