
It’s a near certainty that, no matter how hard you strive for your office to be paperless, you will find that you need to scan items such as incoming correspondence, signatures pages, and exhibits. As the items that often have the most detail, it’s important to learn the best practices for exhibit scanning as one of the top eFiling skills.
Today, with more and more courts expecting documents to be electronically filed, being able to scan and distribute documents by PDF isn’t just a “nice to have:” It’s an essential office skill.
To get started you’ll need a scanner in your office and, serious proponents of going paperless suggest, one on each desk. A fast and reliable scanner that is capable of handling a high volume of papers is a must. Check out our guide to choosing the best >>
Scanning court exhibits
One of the most important scanning tasks you’ll likely undertake is the preparation of the exhibits for your trial court papers.
The advantages of having exhibits in electronic form wherever possible are substantial, especially in terms of the ease of sharing and simpler navigation (because of text searchability). However, there are some court requirements that you need to be aware of.
The most important of these requirements is that scanned items be clearly legible to the human eye, free of defects that impede readability (like speckling, skewing, poor contrast, folded pages, tears, etc.), and scanned at sufficient quality (almost always a minimum of 300 dots/pixels per inch).
Best practices for scanned exhibits
To be confident that your scanned exhibits meet the court’s requirements for image quality, retention, and security you should follow these best practices:
- Retain originals — Always keep the original and store it securely. It’s also best to store a copy of the scan of your exhibit in a secure drive and, ideally, backed up on your external hard drive.
- Scan at 300 dpi — To ensure image quality, you should scan all exhibits at 300 dots per inch (also often referred to as pixels per inch). This is the minimum required by many rules of court (e.g. in California) and meets the National Archives Standards.
- Remove metadata — Before applying OCR, you should remove metadata from your files. There isn’t likely to be much on scanned items, but be aware that any comments or annotations that were electronically added in your office may still be visible unless completely wiped.
- Apply optical character recognition — Most state court rules, including in California and Texas, require that exhibits be text searchable so far as is feasible. To achieve this, you’ll need to apply OCR. Make sure, though, that the OCR layer is hidden and does not replace the original image, which must remain visible.
How to audit the quality of scanned images using Acrobat
If you’re scanning an original item yourself, then you can be fairly sure of the image quality because you can choose the precise quality setting on your scanner.
How, though, can you check if the image quality of exhibits that you have received electronically is sufficient?
If the exhibit you’ve received electronically is largely written, e.g. a medical bill, record, letter, and so on, then you can use your judgment as to whether the contents are completely legible to the human eye. While exhibits like these are allowed to have imperfections, like folds, creases or tears, they must not block any text on the page.
If the exhibit is a photograph or other image, you can use Acrobat’s Output Preview tool to view the details of the image and to check if it meets the court’s requirement that it contain at least 300 dots/pixels per inch. Here’s what to do:
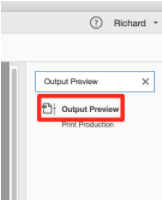
STEP ONE
In the Tools menu on the right-hand side of the screen, search for “Output Preview.” Click on the option that appears to open the Output Preview dialog box.
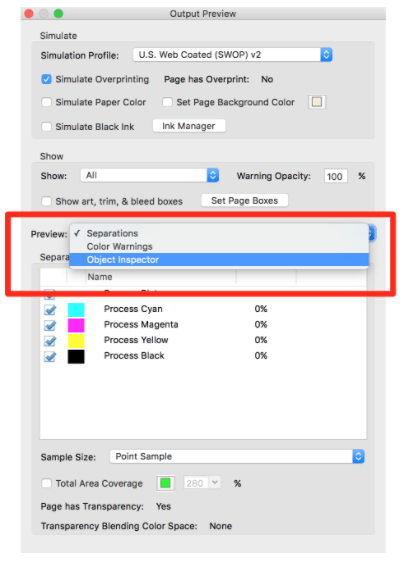
STEP TWO
In the Output Preview dialog box, select Object Inspector in the Preview drop-down menu.
STEP THREE
Finally, scroll to the image that you wish to inspect, hover over it with the crosshair cursor, and click. When you click, Acrobat will display a list of information it can gather about the image, including its resolution.
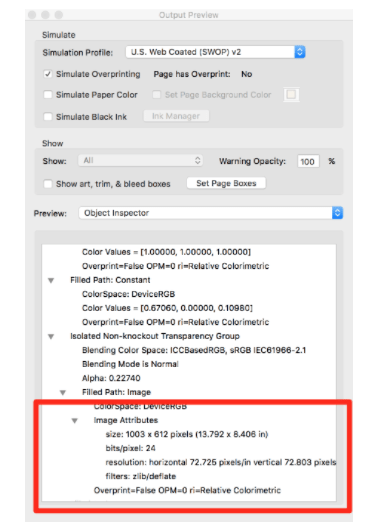
If your image is below the resolution required by the court, you have a few of options. First, try to obtain a better quality image; second, try to enhance the quality of the image; or finally, submitting the image but noting that it is the “best available.”
The more prevalent eFiling becomes, the more strategies we learn for becoming more effective. What are the best practices for exhibit scanning in your law firm for your court?