Need to know how to add a bookmark to a PDF? Look no further.
If you’re eFiling documents at court, whether in California, Texas, or elsewhere, it’s best practice to add electronic bookmarks so that the document is as easy to navigate as possible on a computer screen.
Whether you’re a seasoned lawyer needing to mark key sections in lengthy contracts, a paralegal streamlining document review processes, or a legal assistant enhancing document accessibility for colleagues, this guide is designed to provide actionable strategies to elevate your efficiency.
Join us as we navigate the realm of PDF bookmarks within the legal sphere and uncover how they can revolutionize your document preparation process. Let’s embark on a journey to simplify document navigation and enhance productivity in your law firm.
In fact, if you’re filing in a California court, you are required by state rule to add electronic bookmarks to the exhibits appended to your filings.
But what are electronic bookmarks and how do you add them to a document?
Let’s jump in and learn how to add bookmarks to a PDF.
What is an electronic bookmark?
Electronic bookmarks work in much the same way as the little plastic or paper bookmarking tabs you add to printed filings. They are simply shortcuts to specific sections of a document which, when clicked, will take the reader directly to that section.
Once added to a document, bookmarks appear in a navigation panel (typically on the left-hand side of the screen).
In most eFiling courts, it’s required that the appended exhibits be bookmarked in this way so that readers can quickly and easily move between each one, without the need to scroll through the entire document.
What are the regulations for electronic bookmarks?
The use of electronic bookmarks is governed by Rule 8.74 of the California Rules of the Court.
Electronic bookmarks are required for every component of an electronic document, including headings, subheadings, and the first page of various elements such as tables of contents, exhibits, or attachments.
Each bookmark must provide a brief description of the linked item. For instance, a bookmark to a heading should include the heading’s text, while a bookmark to an exhibit should include its identifying letter or number along with a brief description.
Additionally, electronic appendices must have bookmarks to indexes and each separate exhibit or attachment, including nested exhibits or attachments. Furthermore, all bookmarks must be configured to retain the reader’s selected zoom setting.
How to add bookmarks using Microsoft Word
If your document is relatively simple and prepared entirely in Word, then adding bookmarks at this drafting stage is quick and simple.
Here’s a step-by-step guide on how to add bookmarks using Microsoft Word:
Step one
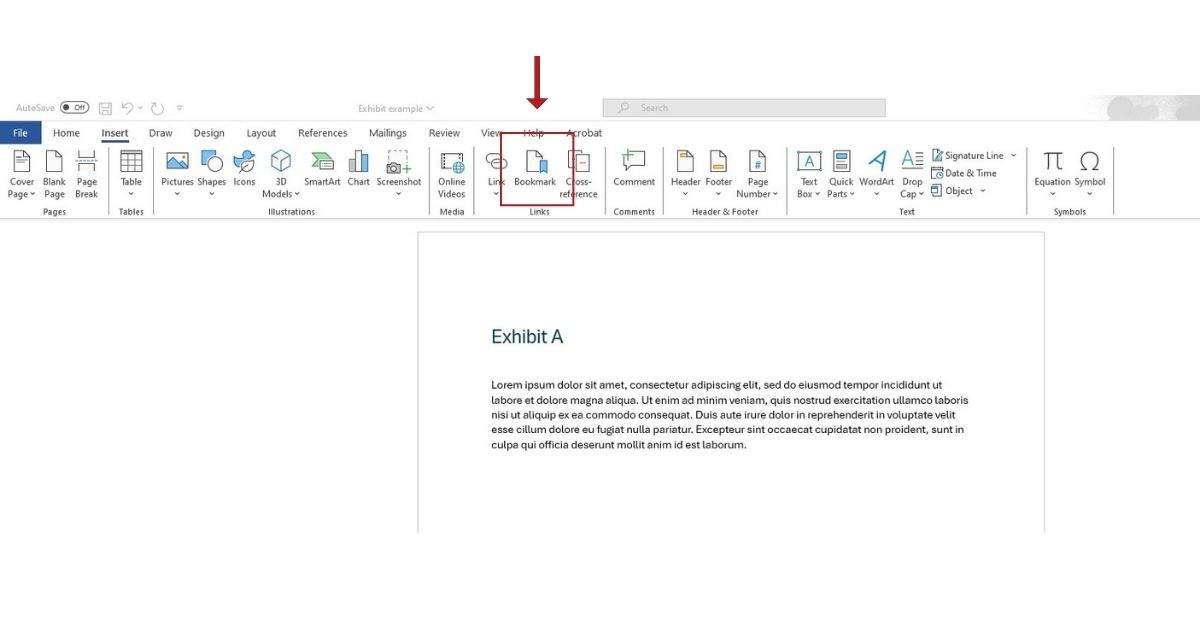
Open your document in Word and navigate to the section or heading you wish to bookmark. Select the title you wish to bookmark and then click on the Insert tab in the ribbon, followed by selecting Bookmark.
Step two
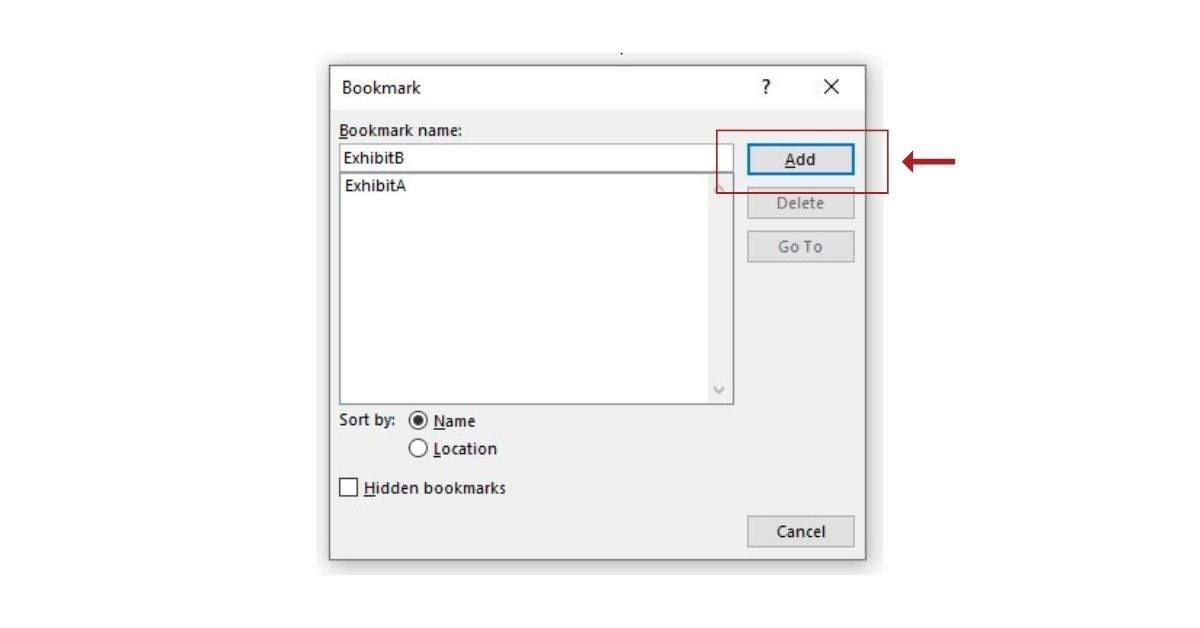
The Bookmark dialog box will open. Type the name of your bookmark and then click Add. Repeat this process until all required sections have been bookmarked.
Step three
Finally, save your document as a PDF. To do this, click on Save As in the File menu. Select PDF in the drop down menu. Before saving, open the Options… menu at the bottom of the Save As dialog box.
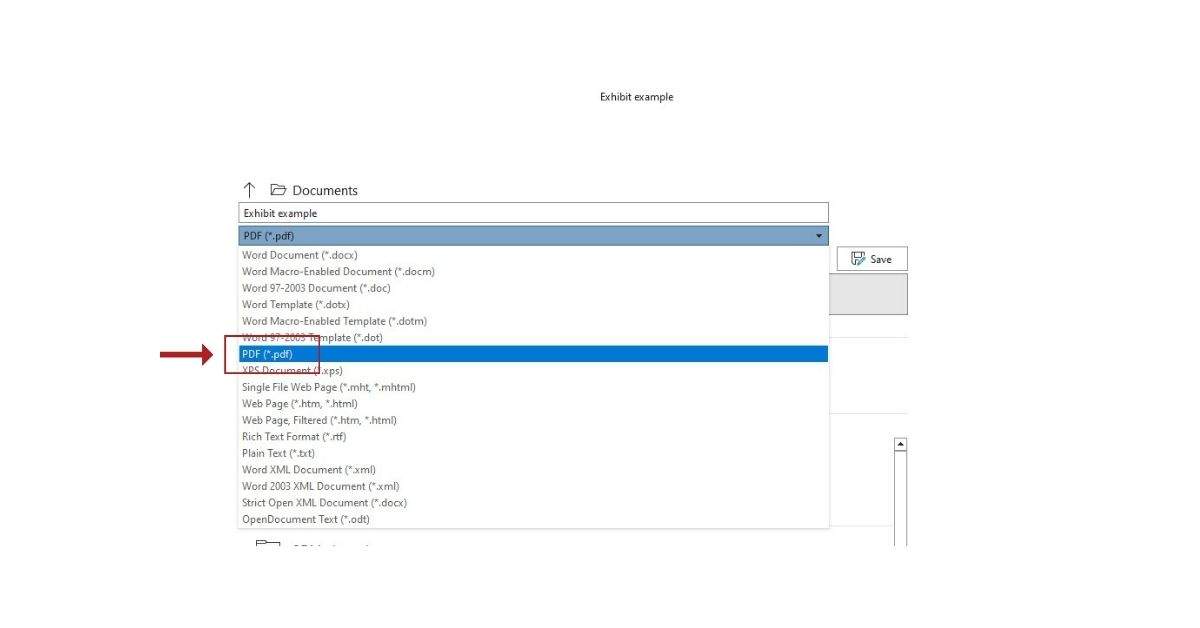
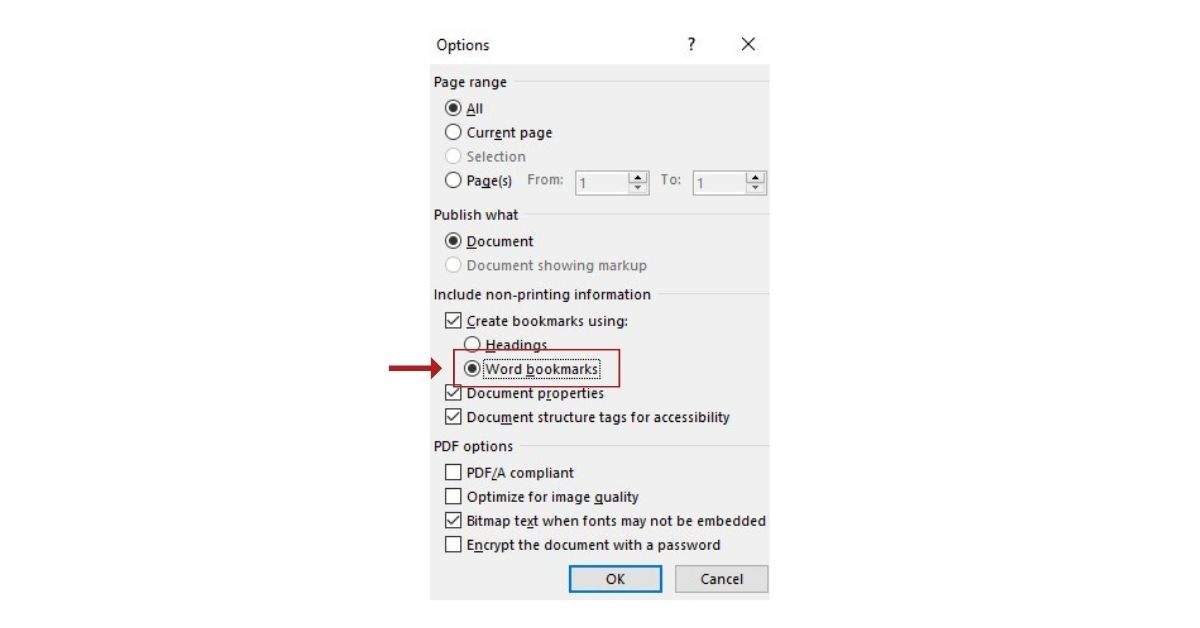
Make sure that the option to Create bookmarks using: is selected and that it is set to use Word bookmarks. Click Options to bring up a new window and make this selection. Then click OK and then Save.
If you would like a visual reference to where your bookmarks are in Microsoft Word, navigate to File, then Options, and click on Advanced. From there, scroll down to Show document content and check the box Show bookmarks.
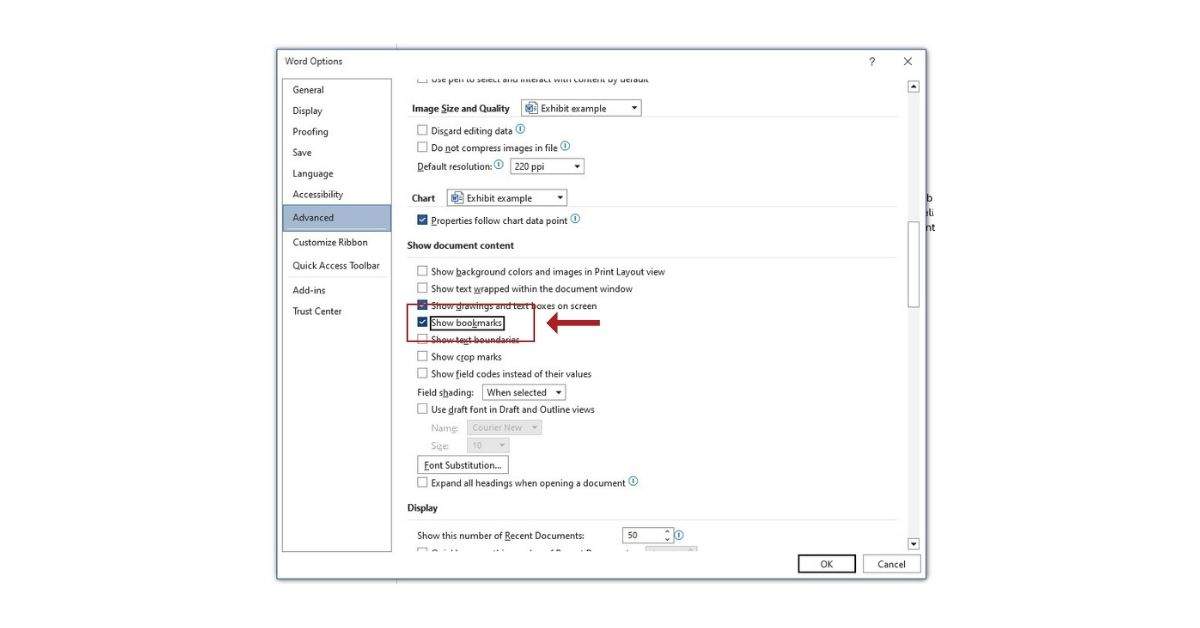
This will give you a visual cue as to where your bookmarks are in Word, which is especially useful if you have a longer document.
How to bookmark a PDF using Adobe Acrobat
If you have access to the professional version of Adobe Acrobat (i.e. the paid for version), then adding bookmarks once you’ve created your PDF is very simple.
If you’re combining multiple documents into a single PDF or adding in scanned exhibits, this may be simpler than adding bookmarks in Word.
What are sub-bookmarks in a PDF?
Before we continue, a quick word on sub-bookmarks in Adobe Acrobat. Sub-bookmarks are hierarchical levels within an existing bookmark in a PDF file.
For instance, if you have a bookmark titled “Exhibits,” you might create sub-bookmarks for “Exhibit A,” “Exhibit B,” and “Exhibit C” under it.
This creates an organized structure within the document’s content. Scroll down to Step 7 for more about sub-bookmarks.
Step-by-step: How to create bookmarks in Adobe Acrobat PDF files
There are a few methods to add bookmarks to a PDF, with or without making a selection.
Let’s explore the steps for how to add bookmarks to your Acrobat PDFs:
Creating a PDF bookmark in Adobe Acrobat
Step 1: Open the PDF in Adobe Acrobat
Launch Adobe Acrobat and open the PDF file you want to work with.
Step 2: Access the Bookmarks panel
Click the Bookmarks button on the right to open the panel.
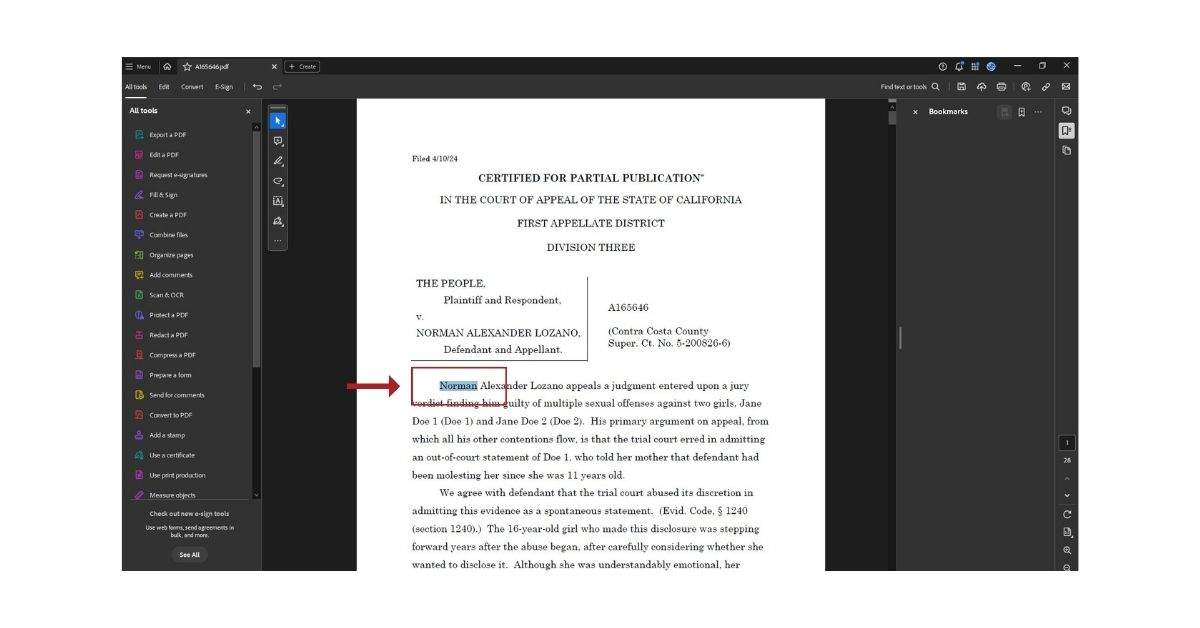
Step 3: Navigate to the desired page
Go to the page you want the bookmark to link to and adjust the view as needed.
Step 4: Select the area you want to bookmark
- To bookmark an image, click on it or draw a rectangle around it.
- To bookmark part of an image, draw a rectangle around the desired section.
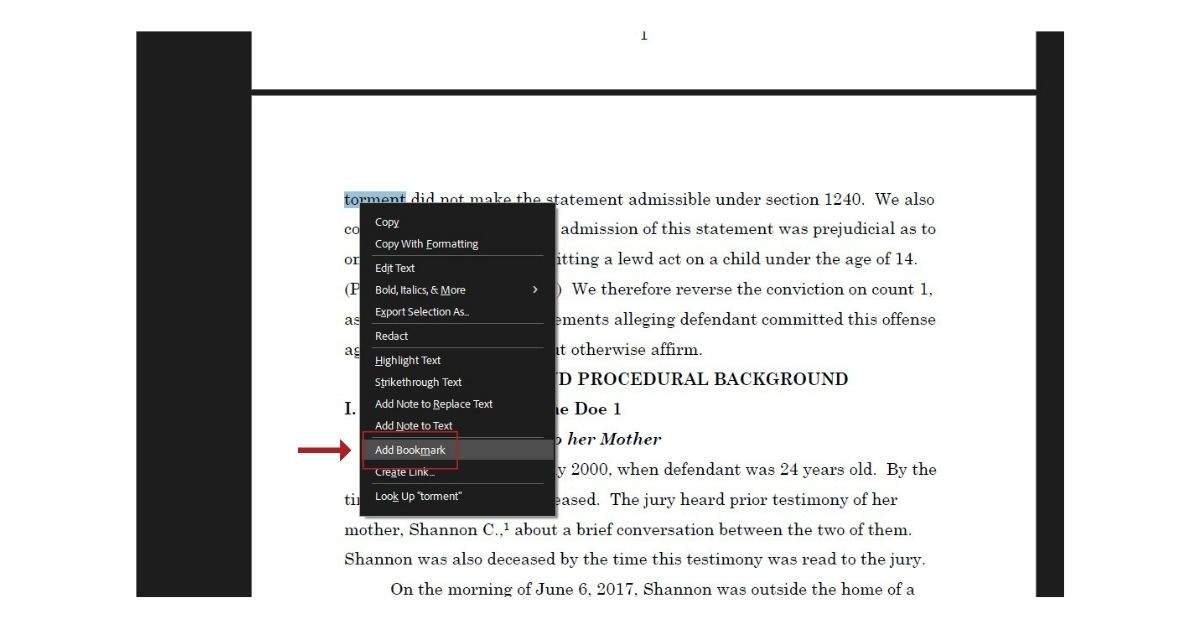
- To bookmark text, highlight the text. The selected text will become the label of the new bookmark, which you can edit.
Step 5: Add a bookmark
- Choose Tools > Edit PDF > More > Add Bookmark.
- Alternatively, if you do not find it here, the Bookmarks option may be found on the sidebar to the far-right of the application.
- It’s worth noting that you can use the CTRL+B (Command+B on Mac) hotkey to instantly bring up the Bookmarks panel.
- Finally, you can right-click on the highlighted text and find the Add Bookmark option to add bookmarks to your PDF in Acrobat.
Step 6: Name the new bookmark
In the Bookmarks panel, you can type or edit the name of the new bookmark.
From the panel, you can also rename and delete your existing bookmarks, as well as a number of other functions.
Step 7: Creating sub-bookmarks
To create a sub-bookmark, first make a bookmark as demonstrated in the previous steps. Then, in the panel, click and drag the desired sub-bookmark under another bookmark to establish a hierarchy. You should see a small blue line indicating where the sub-bookmark will live.
Using Preview on MacOS to create bookmarks in a PDF
If you are using a computer with MacOS, then don’t worry! You can use the built-in Preview application to add and delete bookmarks in your PDFs on Mac.
Let’s take a look at the steps for creating bookmarks in Preview on Mac:
Step 1
Open your PDF with Preview.
Step 2
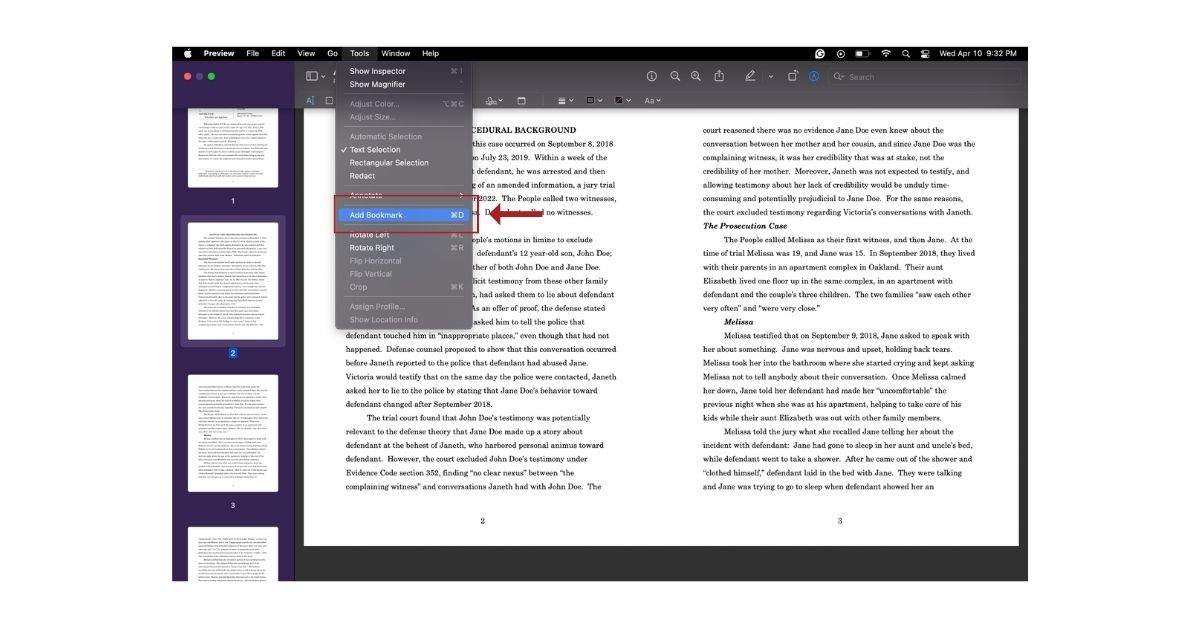
Select the desired text and navigate to Tools, and then click Add Bookmark.
Alternatively, after selecting the text, you can simply use the hotkey Command+D to create a bookmark.
Step 3
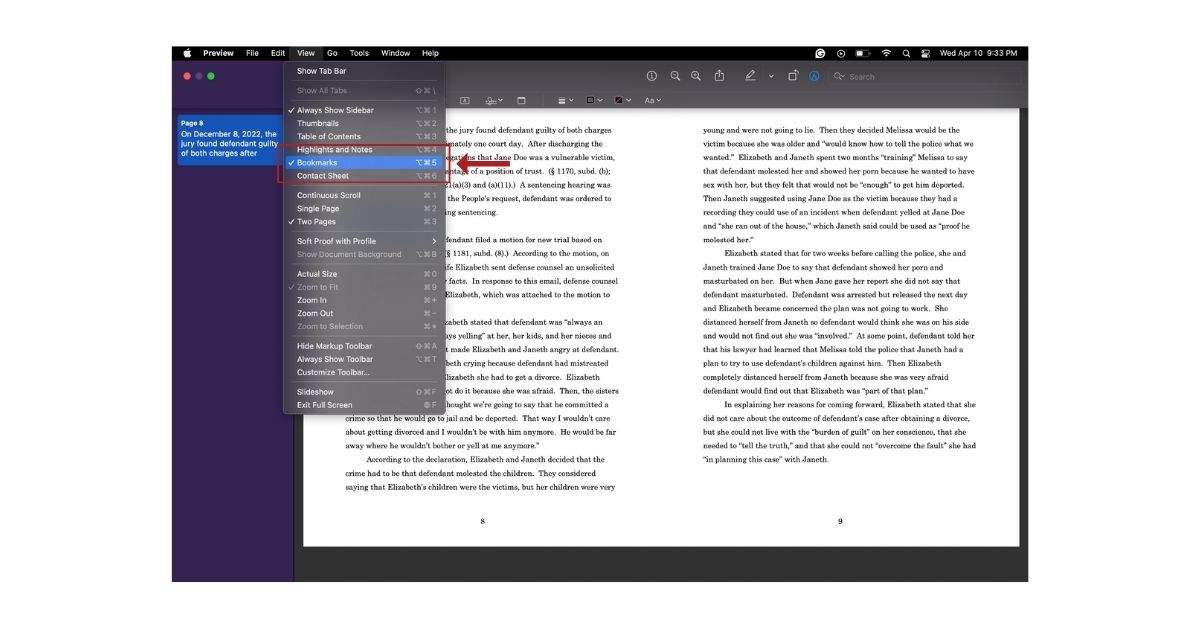
Ensure that you have the Bookmarks panel selected, as it is turned off by default. Go to View, then find Bookmarks and ensure there’s a check next to it.
Alternatively, the hotkey Option+Command+5 can be used to toggle the Bookmarks panel in Preview.
Alternatives to Acrobat
While Acrobat is widely regarded as the market leader in PDF editing software, but it can be a little costly. Therefore, if you’re filing infrequently or only making simple changes to PDFs, you may wish to consider an alternative.
Some free online tools
- Open source software — There are a few Open Source (that’s to say, freely available) PDF editing tools available. One of the most popular, Libre Office Draw, has similar functionality to Acrobat.
- Bookmarking-only tools — There are a handful of tools, like JPDFBookmarks, available that allow bookmarks to be added to existing PDFs but have no other features.
Other tools (free and paid)
There are several free tools available that can help you add bookmarks to PDF files.
Here are some popular options:
PDF-XChange Editor
PDF-XChange Editor is a PDF editor with free and paid versions.
The free version allows you to add bookmarks and offers other basic editing tools.
You can download the software from the official website.
Foxit Reader
Foxit Reader is a popular free PDF reader that includes bookmark-creation tools.
You can add bookmarks to PDFs and take advantage of other features such as annotation and commenting.
Download the software from the official website.
Soda PDF
Soda PDF offers an online PDF editor that includes the ability to add bookmarks to PDFs.
The online tool is free to use, though there are paid versions available with additional features.
Visit the Soda PDF website to access the online editor.
Sejda PDF Editor
Sejda is another online PDF editing tool that offers free and paid plans.
You can add bookmarks to your PDF using the online tool.
Access the tool on the Sejda website.
PDFsam
PDFsam is an open-source PDF editor that includes features for splitting, merging, and adding bookmarks to PDFs.
You can download PDFsam for free from the official website.
These free tools vary in their feature sets, user interfaces, and limitations.
Depending on your needs and preferences, you can choose the one that best suits you, but Word and Acrobat should suffice in most situations.
Conclusion
We hope this guide has proved a useful resource for you on how to add bookmarks to a PDF. We all know how crucial it is to get right, especially in legal settings where precision and organization are key.
Whether you’re using Microsoft Word to prepare documents with bookmarks at the drafting stage or utilizing Adobe Acrobat to add bookmarks directly to your PDF, the process is straightforward and can be tailored to your specific needs.
By following the step-by-step guides provided in the how-to sections, you can easily create bookmarks and sub-bookmarks in your documents. This will allow you to efficiently navigate through complex content and ensure that your documents are well-organized and easy to reference.
Regardless of the tool you choose, incorporating bookmarks into your PDFs will streamline your workflow and improve productivity. Embrace this simple yet powerful practice to make your PDF files more user-friendly and accessible for you and your colleagues and ensure you are meeting the state’s guidelines.


